Episode 14: New Mexico Red Chile Sauce

This week, by special request from a fellow New Mexican, I cook up a batch of the distinctive red chile sauce used all over everything in New Mexico.

New Mexico Red Chile Sauce
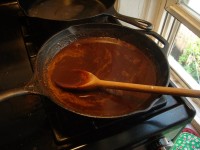
redchile-016I usually eat this on scrambled or fried eggs, topped with some grated cheese and briefly melted under the broiler. You can of course use it for a batch of enchiladas (you might want to double the recipe), but I find I rarely get there before I eat it all up. It’s also good dropped in posole (hominy stew). It lasts for about a month in the refrigerator, in a tightly sealed jar, and it tastes better if you let it sit overnight and reheat.

As I say in the podcast, purists often don’t use any spices at all. If you do use them, go light–too much cumin or oregano can make the whole thing taste kind of muddy and cheap.

Makes about 2 1/4 cups
1/2 cup ground New Mexico red chile
scant 2 tbsp flour (about 2 heaping teaspoons)
1/4 tsp ground cumin (optional)
1/2 tsp ground coriander (optional)
2 tbsp lard or vegetable oil
2 cloves garlic
2 cups water or chicken stock
Pinch salt
Pinch dried oregano (optional)

Turn on your kitchen fan or open a window–the oils in the chile can make you cough.

Heat a heavy skillet over medium heat. Add the chile, flour, and, if using, cumin and coriander, and quickly stir to toast the spices, just until fragrant and the chile darkens slightly. Take the skillet off the heat if you’re worried the chile has gone too far, and continue to stir the dry mix until it cools a little.
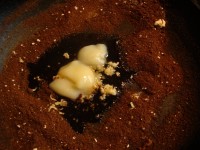
redchile-009Scrape the dry mix to the sides of the pan to leave an empty spot in the center. Squeeze the two garlic cloves through a press (or mince the garlic very finely beforehand) into the center of the pan, then add the vegetable oil or lard. Stir and fry the garlic until fragrant, then incorporate the dry spices into the oil to make a very thick, dry paste. Fry this a little bit more–maybe just 10 seconds or so, max.
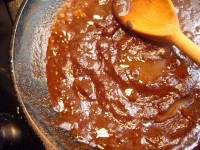
redchile-010Slowly add the water or chicken stock, stirring constantly and working out any lumps you see. The sauce will thicken almost instantly (as in the photo), but by the time you’ve added the full 2 cups of water, it will be quite thin again–this is fine. Add a pinch of salt, and some oregano if you like.
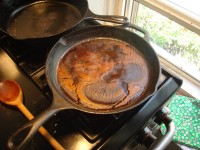
redchile-015Bring the sauce up to a boil, then immediately turn down to the lowest heat, so that it is just simmering. Let simmer for about 20 minutes or so, until it’s a bit thicker. Stir it occasionally to work in the skin that forms on the top (as in the photo). If it gets very thick, you can always thin it with a bit more water.

Store in a jar in the refrigerator. When reheating, you’ll probably need to add a bit of water to thin the sauce out again.

*Lard: Use good freshly rendered stuff (ask for manteca at your Mexican grocery), not the hydrogenated Armour blocks. If you can’t get the good stuff, use vegetable oil.
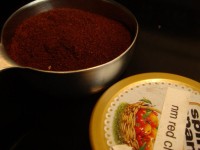
redchile-006*Chile: Purists usually start not with ground chile, but with whole New Mexican chile pods. And these might also be easier to find outside of New Mexico than the ground chile. Look in your Mexican grocery–they’re often sold alongside all the other varieties (ancho, mulato, etc.) and labeled “New Mexican.” If you’re starting with whole pods, pull of the stems, then crack them open and pull out all or most of the seeds, depending on how much heat you want. (Oh yeah–and one New Mexican cookbook I have advises you to wipe the dust off the chiles first–presumably if they’ve been hanging around on a ristra.) Lay the chile pods out on a cookie sheet and toast them in a 400-degree oven for about five minutes, until they darken and dry out a little bit. Then let them cool, and whiz them up in a spice grinder or a blender. (The cooling is important–hot chiles will release tons of oils into the air, which are painful to breathe.) Then proceed with this recipe, skipping the bit about toasting everything in a dry pan.

New Mexico Red Chile Sauce on FoodistaNew Mexico Red Chile Sauce

*Shameless self-promotion: I happen to write two guidebooks to New Mexico for the Moon Handbooks series. If you’re planning a trip to the state (and you should, to get more chile!), check them out here and here.

Episode 10: Date-and-Cinnamon Bulgur Pilaf, Quick-Pickled Green Beans and Macerated Strawberries

This week, I make an easy pilaf with Middle Eastern flavors: dates and cinnamon, plus salty feta. Green beans pickled with dill and garlic are on the side, and for dessert, we have a quick trick for making strawberries taste their best. It’s all quite quick, and ideal for hot weather, when you don’t want the stove on for too long.

Click to play this episode in a new window; right-click to download
Subscribe via iTunes
Subscribe via RSS

Shopping list

    Butter or olive oil (at least 2 tbsp)
    Feta cheese (about 1/4 pound, or less, depending on your taste)
    1 medium onion
    2-4 cloves garlic
    Bunch parsley
    Bunch dill (or dried dill, if you happen to have that)
    Green beans (several big handfuls, about 3/4 lb.)
    Strawberries (6 or so big ones)
    Large dates (about 6)
    Ground cinnamon and/or cinnamon sticks
    Ground allspice and/or whole berries
    Pinch red pepper flake
    Pine nuts or almonds (at least 1/4 cup)
    Bulgur (no. 2 grind, ideally, about 1 1/2 cups)
    Cider vinegar (at least 1/3 cup)
    Balsamic vinegar (just 1 tsp)
    Sugar (a pinch)
    Honey (1/2 tsp)

Date-and-Cinnamon Bulgur Pilaf

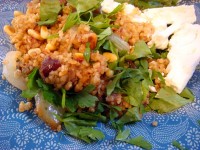
bulgur-004I got the basic idea for this pilaf from the excellent Moosewood Cookbook Cooks at Home, which I recommend as a good beginner cookbook even if you don’t happen to be vegetarian. (See my blog, Roving Gastronome, for more about what’s great about the book.) In that cookbook, the base is precooked rice, and that works very well. I just like the chewy texture of bulgur, and it cooks very quickly. You can use whatever combination of ground or whole spices you happen to have.

For about 4 servings
1-2 tbsp butter or olive oil
1 medium onion
Pinch salt
6 large dates
Large pinch ground cinnamon, plus 1 or 2 cinnamon sticks (optional)
Pinch ground allspice, plus 5 or 6 whole allspice berries (all optional)
1 1/2 cups bulgur (no. 2 grind, ideally)
2 1/4 cups water
Large handful pine nuts or almonds
Large handful parsley
Feta cheese, however much you like (goat cheese also works)

In a heavy saucepan with a tight-fitting lid, melt your butter or heat your olive oil over medium heat. Slice up your onion and toss it in, along with a generous pinch of salt. While the onions are softening up, slice up your dates into smallish bite-size pieces, then toss them in with the onions. Add the cinnamon and allspice and stir. Once the onions are soft and translucent, pour in the bulgur and stir to coat with oil (add a tiny bit more if you need to). Then pour in the water, give a good stir and put the lid on. Let the mix come to a boil, then turn down to the lowest simmer.

While the bulgur is simmering, chop your parsley coarsely. In heavy skillet over high heat, toast the pine nuts until just golden brown; immediately remove from the hot pan when they’re done. Set out your feta (or goat) cheese.

Check your bulgur after about 10 minutes. You want it to be chewy, and all of the water should be absorbed–if it’s still crunchy, put the lid back on for another minute or two. A lot depends on the weight of your pot and the flame on your stove. It’s OK if the bottom layer gets a bit dried and stuck to the bottom of the pot, but be careful not to let it scorch. If the bulgur is sticking and the texture is good, but the whole mix is still a bit moist, turn off the heat, fluff the bulgur up with a fork and leave the lid off for a few minutes, to let some of the steam dissipate.

Serve with parsley (you can mix it in with the bulgur, or sprinkle it on each serving) and toasted pine nuts–sprinkle these over the top, so they don’t get soggy. Set a slab of feta cheese on the side, or crumble it over the top.

Leftovers are good at room temperature; be sure to store any extra pine nuts separately, so they keep their texture.

Quick-Pickled Green Beans

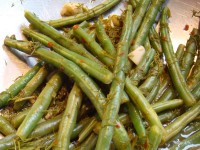
bulgur-008This is a great, simple treatment for green beans, and works for other crispy or relatively firm vegetables as well. You can vary the herbs and spices that go in as well–though if you had many more spices, you should probably remove the green herbs altogether, or the flavors will get too muddled. Dried herbs can work nearly as well as fresh–if you’re using them, add them to the vinegar mix just at the end of the boiling, so they get a bit rehydrated.

For about 3 side servings
2-3 large handfuls green beans (about 1 lb.)
Large handful fresh dill (or 1 heaping tbsp dried dill)
3 or 4 garlic cloves, peeled and roughly crushed (or 2 garlic cloves, peeled and minced fine or pressed)
Large pinch red pepper flake (optional)
About 1/3 cup cider vinegar (or other fruity variety)
Small dab honey or sugar, less than 1/2 teaspoon

Set large pot of generously salted water on to boil. Rinse beans and snap stem ends off; remove tips if soft. Rinse dill and chop coarsely; set in a large stainless-steel bowl. Boil beans for about 1 minute, until bright green and just barely soft, then set in bowl with dill.

While beans are boiling, combine garlic, red pepper, vinegar and honey in a small nonreactive (stainless steel) saucepan and boil for 1-2 minutes. Pour hot liquid over beans and dill, stir to combine and set aside for at least 10 minutes. Taste for salt right before serving–it may need a little extra. The flavor will develop the longer they sit, and they keep for several days in the fridge.

Macerated Strawberries

bulgur-011This is an excellent treatment for good strawberries, and it also helps save ones that aren’t quite as good as they should be. For two people, simply wash, trim and roughly slice about six big strawberries. Place in a bowl and dust with a small amount of sugar–only about 1/2 tsp. Then sprinkle over about 1 teaspoon balsamic vinegar, just enough to coat the berries. (If in doubt, add less, not more–there should just be a slight slick of vinegar in the bowl, not a pool in the bottom.)

Let sit for at least 20 minutes, but not more than a couple of hours. The strawberries will give off some of their juices–combined with the sugar and vinegar, it makes a very light syrup. The strawberries are great on ice cream, or with Greek yogurt.

Note: In the podcast, I use a bit of oxymeli, rather than balsamic vinegar. It’s extremely delicious, and more complex, but I’m not sure the stuff is easily available. Still, if you happen to see it, it’s an intriguing treat…

Episode 7: Pad Thai and Cucumber Salad

This week, I demonstrate the relative ease with which you can make this takeout staple for your own sweet self. Plus, absolutely no wok required! The shopping list might look a little daunting, but all the odd stuff will keep in your pantry a very long time, so whenever you have a pad thai craving, you just have to pick up the few fresh ingredients. The cucumber salad on the side is cool and refreshing, and just generally good to know.

Click to play this episode in a new window; right-click to download
Subscribe via iTunes
Subscribe via RSS

Shopping list

    Rice noodles (whatever size you prefer)
    Small shrimp
    Firm tofu
    Eggs
    Rice vinegar
    Fish sauce (aka nam pla or nuoc mam)
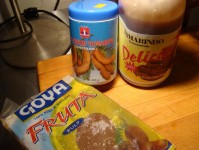
    Tamarind concentrate (see photo below for options: Goya or other tropical brand unsweetened frozen pack; Thai unsweetened, stocked with other sauces; Mexican sweetened, stocked with drink mixes)
    Sugar
    Cayenne Pepper
    Roasted, unsalted peanuts
    Peanut oil (or vegetable oil)
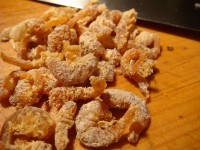
    Small dried shrimp (optional; see photo below)
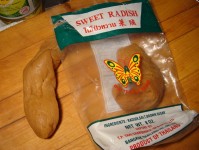
    Preserved radish (optional; see photo below)
    Shallots
    Garlic
    Bean sprouts
    Scallions
    Cilantro
    Limes
    Cucumbers
    Jalapeno or other small fresh chile, red or green
Preserved radish

Preserved radish (click to enlarge)

<i>Dried shrimp</i>

Dried shrimp (click to enlarge)

Varieties of tamarind concentrate: Goya frozen, Thai unsweetened, Mexican sweetened

Varieties of tamarind concentrate: Goya frozen, Thai unsweetened, Mexican sweetened (click to enlarge)

Pad Thai

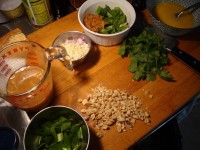
pad-thai-016The various ingredients are all worth tracking down for the extra flavor and texture they add, but the most important element is the tamarind, which adds the crucial sourness. Before you start, make sure you have your counters cleared and a lot of little bowls at the ready–you’ll want to keep each prepped element separate. Also, you can prep the various items in any order–the order I do it in the podcast is random, just as things popped to mind. You may devise a smarter system.

For 2 dinner servings, and very generous lunch leftovers; could serve 3 hungry people for dinner, or even 4 not-so-hungry people

Set to soak in very hot tap water to cover:
8 oz. rice noodles

Peel the shells off:
5-6 oz. small shrimp (about 16)

Pat dry and chop into 1/2-inch-or-so cubes:
3-4 oz. firm tofu

pad-thai-008Set in separate bowls:

    1-2 shallots, diced fine
    2 garlic cloves, minced fine
    2 eggs, lightly beaten
    2 tsp water
    Large pinch salt
    Green parts of 2-3 scallions, sliced in 1/2-inch pieces (on a diagonal looks prettiest)
    2-3 tbsp sweet preserved radish or turnip, in slivers (optional, but adds a nice chewy sweetness)
    1/4 cup rice vinegar
    1/4 cup fish sauce
    Generous 1/4 cup tamarind concentrate (see shopping list for specifics; if using sweetened Mexican variety, omit sugar below)
    Scant 1/4 cup sugar, or whatever to taste
    Large pinch cayenne pepper, or whatever to taste
    1-2 tbsp tiny dried shrimp, chopped coarsely (optional, but adds a nice extra layer of shrimpiness)
    Large glug peanut or vegetable oil
    *You may want to make a little extra of this sauce, in case your noodles get a little dry in the final cooking, or if you think you might be craving pad thai again within the week.

Garnishes, all in separate bowls:

    2-3 cups bean sprouts, rinsed (these can just stay in your salad spinner to drain)
    1/2 cup roasted, unsalted peanuts, coarsely chopped
    Green parts from 1-2 scallions, sliced in 1/2-inch pieces
    Leaves from half a bunch or so of cilantro
    2 limes, quartered
    *If you’ll be eating only part of the pad thai for dinner, and saving the rest, of course scale back the garnishes as necessary. If you have extras, store them separately from the pad thai so they stay fresh and crunchy.

When you’ve got everything prepped–or at least everything up to the garnishes–heat up a big cast-iron skillet on high. Add:
Big glug peanut oil (ideally; veg oil is fine too)

Toss in the tofu and fry, without stirring, until the tofu has a little crispiness on one side; stir to flip the cubes over and fry a bit longer. (This will take longer than you think, so you can use this time to prep the rest of your garnishes.) Then remove the tofu from the pan and set aside back in its bowl.

Add a little more oil to the pan if it’s looking dry, then toss in the shrimp and spread them out in a single layer. As soon as you can see pinkness creeping up the sides, flip them. By the time you’re done flipping them over, the first ones can come out–total cooking time is 1 minute, absolute max. Remove the shrimp from the pan and toss them in with the tofu.

Add a little more oil to the pan, then toss in the shallots and garlic. Fry until fragrant and just browning.

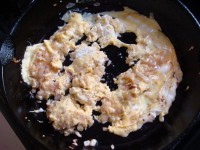
pad-thai-009Then add the eggs, and stir a little and fry until set (as in photo), then break into chunks with your spoon.

Drain the noodles, if you haven’t already, and add them to the pan and give them a quick stir. Then pour in the tamarind sauce mixture. There will be quite a lot of liquid. Turn the heat down to medium and let the noodles simmer for about 1 minute, just until the noodles have absorbed a lot, but not all, of the liquid–there should still be visible sauce in the bottom of the pan.

Toss in the scallions and the preserved radish. Stir to combine, and just let the scallions wilt (you might want to crank up the heat again very briefly). Finally, after about another 30 seconds, when the noodles are sticky but not dripping in sauce, turn off the heat, but leave the pan on the burner as you stir in the shrimp and tofu. (If in doubt, turn off the heat early–you don’t want your noodles to dry out and glom together.)

Let everything sit in the pan for a minute, for the flavors to meld, then serve up on plates, topped with bean sprouts, cilantro, peanuts, and fresh squeezes of lime.

Cucumber Salad

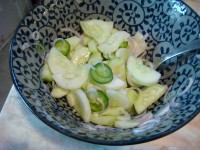
cucumber-saladThis cool, crunchy salad is a nice counterpoint to pad thai. It also goes well with just about any Asian-style stir fry. You can use any combination of shallot and/or scallion, or even red onion, and whatever kind of chili you have around. And, though, I don’t do it in the podcast because it would be too repetitious with the pad thai, you can also add cilantro.

Serves 2
2 small cucumbers, or most of a large one
1 large shallot, or the white parts of 2 scallions
1/2 jalapeno, or green or red bird’s-eye chili
3-4 tbsp rice vinegar
1-2 tsp water
1-2 tsp sugar
Pinch salt

Peel the cucumbers and slice lengthwise, then into half-rounds, as thin as you have patience for. Slice the shallot in thin half-rings, or the scallions in rings. Slice the jalapeno in rings, discarding the seeds if you like. Combine all this in a bowl, then add the vinegar, water, sugar and salt and stir to combine. Let sit about 20 minutes if you have the time.

Pad Thai on FoodistaPad Thai